


Sometimes you don’t want to use the default slugs for the posts. That’s why you might need to change the slugs to your custom ones.

Introduction
From this tutorial, you’ll learn how to change custom post type slug. Pay attention, that the method described below works for the themes under the GPL license. There is another link format for other themes.
To start, let’s briefly refresh your knowledge about concept the of “slug”. A WordPress slug is a few words that you choose to describe a post, page, category, or tag in WordPress. After, these words help form some parts of URLs (or permalinks). They direct visitors to website content.
Despite most often slugs appear in URLs, their value is really wider. Every slug is a unique identifier string that is understandable to people (unlike IDs) and contains only “safe” characters, like:
- – 0-9;
- a-z (generally accepted – lowercase);
- symbol -;
- sometimes another symbol _.
Steps to Change Custom Post Type Slug
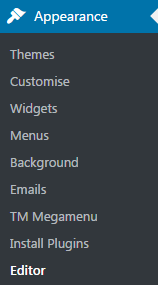
- First, log in to WordPress Dashboard. Navigate to the Appearance tab in the left column. Click on Editor submenu.
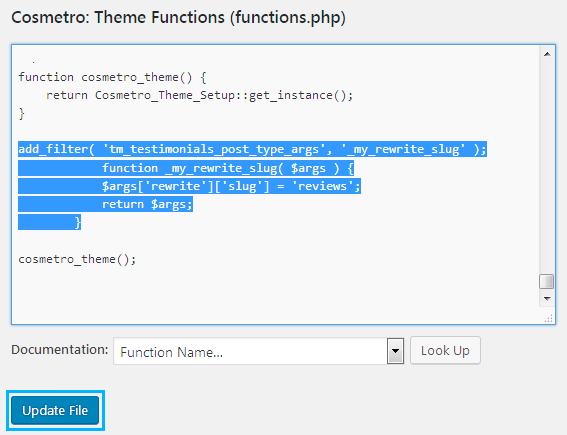
- Find Theme Functions link in the column on the right side of the Editor page. Open it.

- Scroll down the code to its very end and add the following lines of code:
- In our example we add ‘our-services’ slug. But you can change ‘our-services’ to any other name you want to use as a slug on your website. Feel free to use this method to change custom post type slugs for Cherry Services, Cherry Projects, Cherry Team Members, etc. Though, you’ll need to paste the corresponding post types and slugs in the code to make it work. You can view the examples of code to change slugs for Cherry Projects, Cherry Team Members and Cherry Testimonials below.
- Save the changes. To do it hit the Update File.
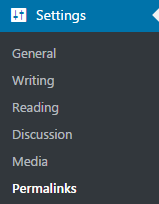
- Now you need to refresh all the permalinks to save your recent adjustments. Proceed to Settings tab in the left column of the Dashboard.
- Click on the Permalinks sub menu.
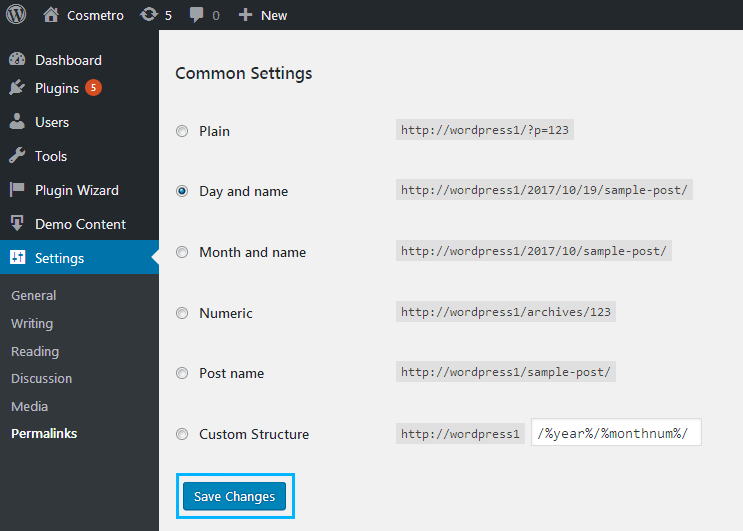
- Click on the Save Changes button.
- On this step, you have to come back to your website and open a single post page. At last, view your changed custom post type slug.

Discover More About Custom Post Type Slugs Use
- Posts and pages
As you know, WordPress automatically generates a slug for each post or page based on the entered title. Then, you can edit the slug and save the best version before publishing. It may differ significantly from the title of the page or post.
- Categories and tags
The two final places in the WordPress console where you can create slugs are categories and tags.
Conclusion
Hopefully, you’ve enjoyed our step-by-step guide on how to change custom post type slug. To sum up, we would like share more tips on WordPress slugs optimization.
So, don’t hesitate to save the next pieces of advice:
- create simple slugs;
- draw attention to your slugs’ relevancy;
- use keywords;
- avoid copies;
- do not change published slugs – probably, this tip is the most necessary. As soon as you publish a link, do not change its slug. Any edits in your URL will cause the traffic loss.
Just be very careful adding and customizing slugs for WordPress website. There are many aspects that need to be studied and mastered.
